


 0
0

Most people wearing ear plugs are getting less than half of their rated noise reduction. Not because the plugs are faulty, but because the insertion technique is wrong. A plug that sits at the canal entrance rather than inside it can deliver as little as 5 dB of real-world attenuation from a product rated at 32 dB. That gap is not a flaw in the rating system. It is entirely a technique problem. Learning how to insert ear plugs correctly takes about 30 seconds per ear, and it is the single most important thing you can do to get the sleep, focus, or hearing protection you are actually paying for.
| Key Insight | Explanation |
|---|---|
| Pull your ear upward and backward before inserting | This straightens the ear canal, allowing the plug to seat deeply instead of stopping at the outer curve. |
| Hold the plug in place for 20 to 40 seconds | Memory foam and disposable foam both need time to expand and fill the canal. Releasing too early causes the plug to back out and break the seal. |
| Your own voice should sound muffled and resonant | The occlusion effect is your primary signal that the seal is working. If your voice sounds normal, the plug is not seated correctly. |
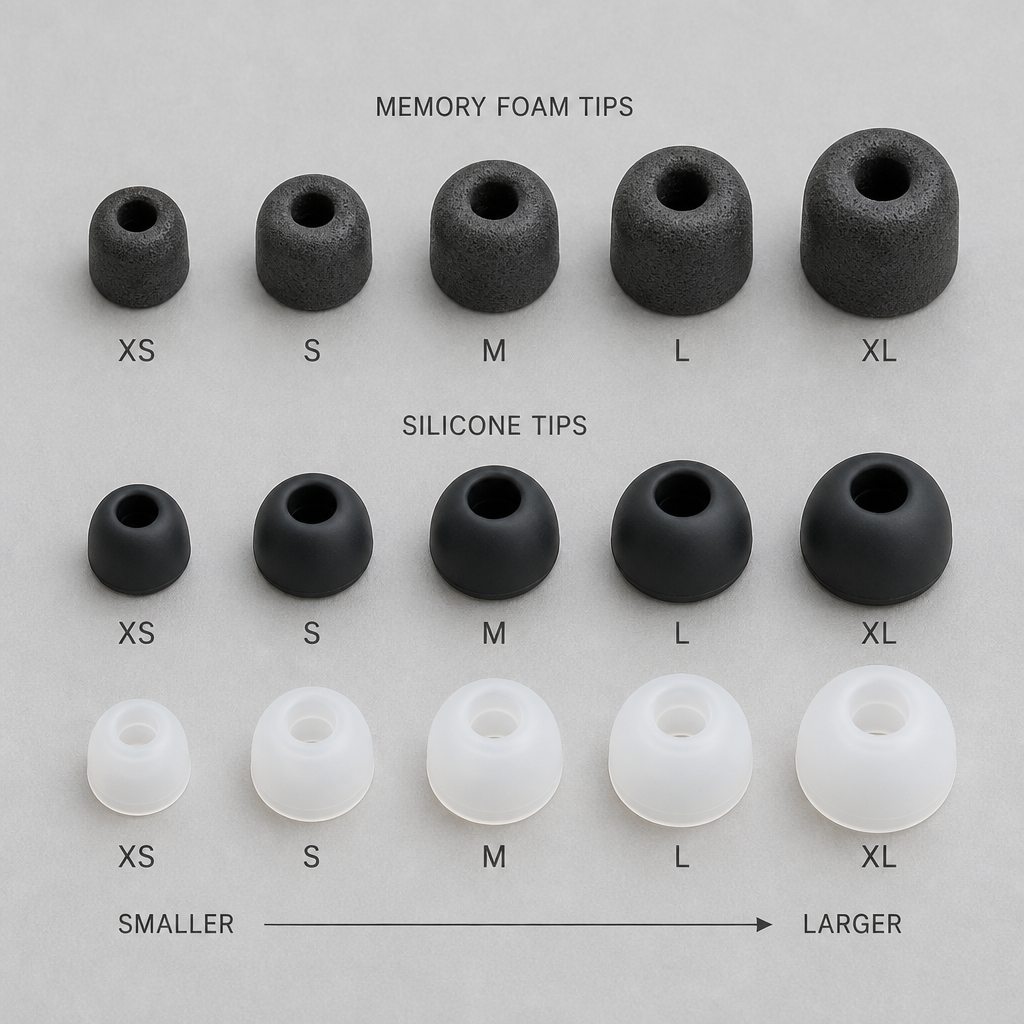
| Tip size matters as much as technique | A correctly inserted wrong-size tip still leaks. For reusable plugs with multiple tip sizes (XS, S, M), test each size to find the one that seals without pressure. |
| Do not insert while lying on your side | Gravity and pillow angle work against you. Insert while sitting upright, then lie down gently after the foam has expanded. |
| The cupped-hands test catches a bad seal immediately | Cup both palms tightly over your ears after insertion. If the noise drops noticeably, the plug was not sealing and needs reinsertion. |
| Dirty or stiff foam tips will not expand properly | For reusable plugs, replace foam tips every 6 to 8 weeks. Compressed, soiled tips lose their expansion capacity and seal quality drops significantly. |
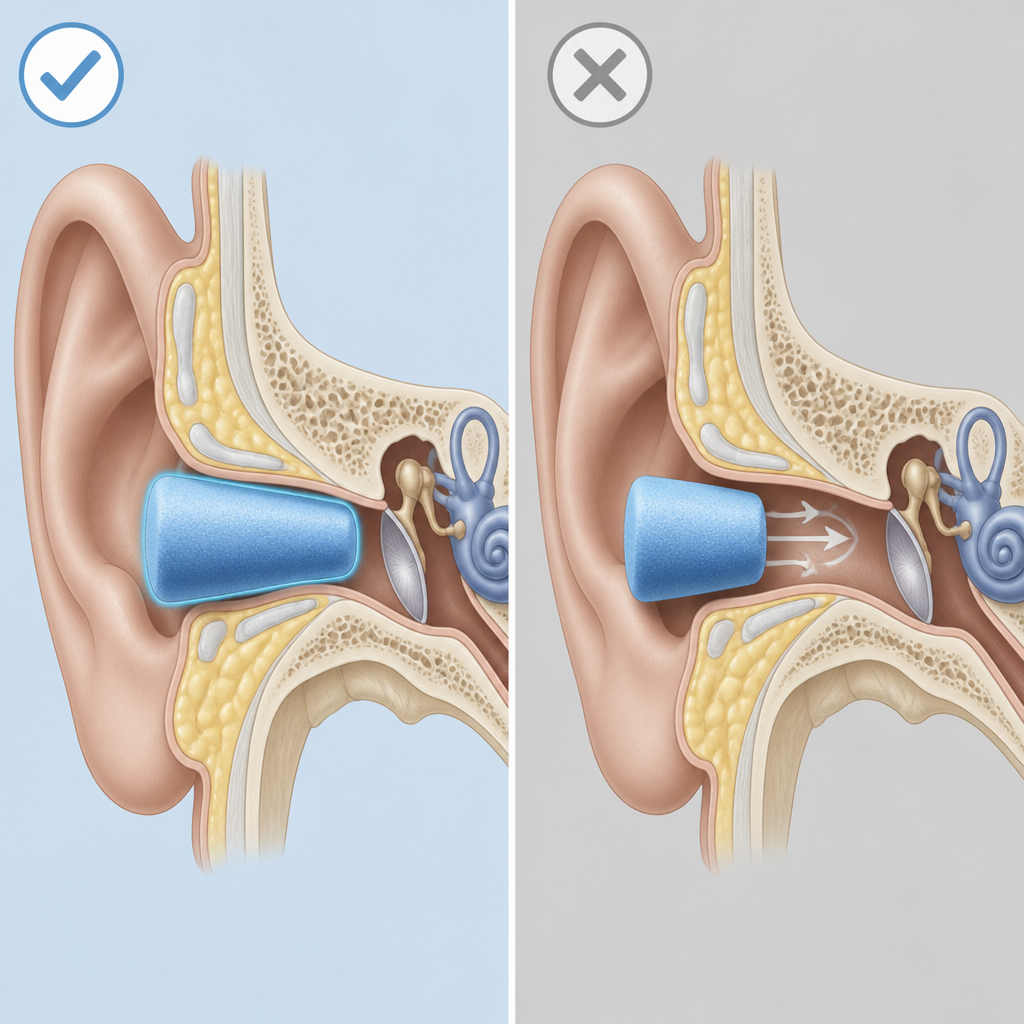
The ear canal is not a straight tube. It curves, and that curve is exactly why the standard push-it-in approach fails. When you insert a plug without first pulling your ear to straighten the canal, the plug bottoms out against the canal wall before it reaches the deeper, narrower section where a real seal forms. The result is a plug that feels like it is in, but leaves a gap that lets in low-frequency noise, which is precisely the range that disrupts sleep and threatens hearing.
The second common failure is releasing the plug too quickly. Foam, whether disposable or memory foam on a reusable plug, needs time to expand against the canal walls. Release it after five seconds and it will spring partially out, sitting high and loose. The rated noise reduction assumes the plug has fully expanded into contact with the entire canal wall, not just the entrance.
Shallow insertion is the single most documented cause of earplug underperformance. A plug that sticks out visibly beyond the ear canal opening is almost certainly not sealing. Properly inserted plugs should sit flush or just inside the canal, with little to nothing protruding.
The third failure is sizing. If you are using a one-size plug in a canal that is significantly smaller or larger, technique alone cannot fix it. This is where reusable plugs with multiple tip sizes have a real practical advantage over disposable foam, which offers no size variation at all.
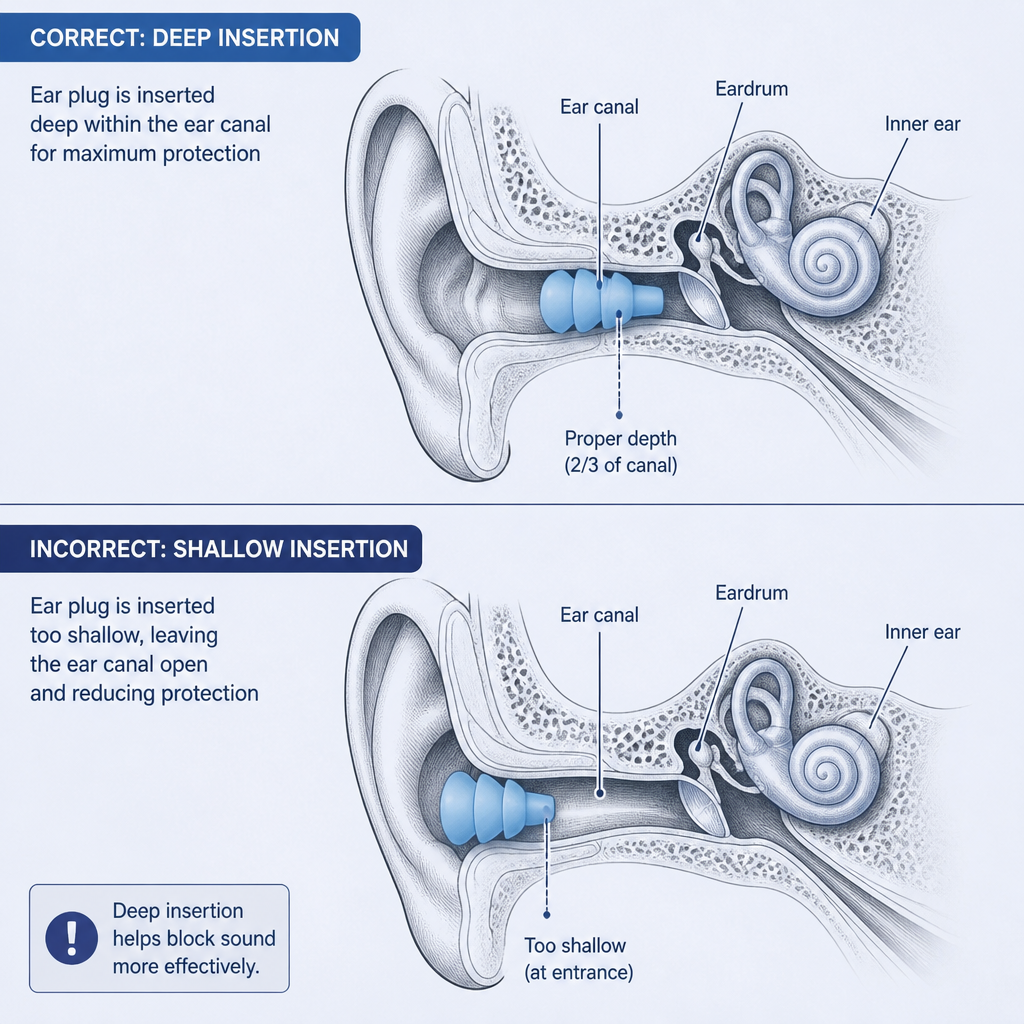
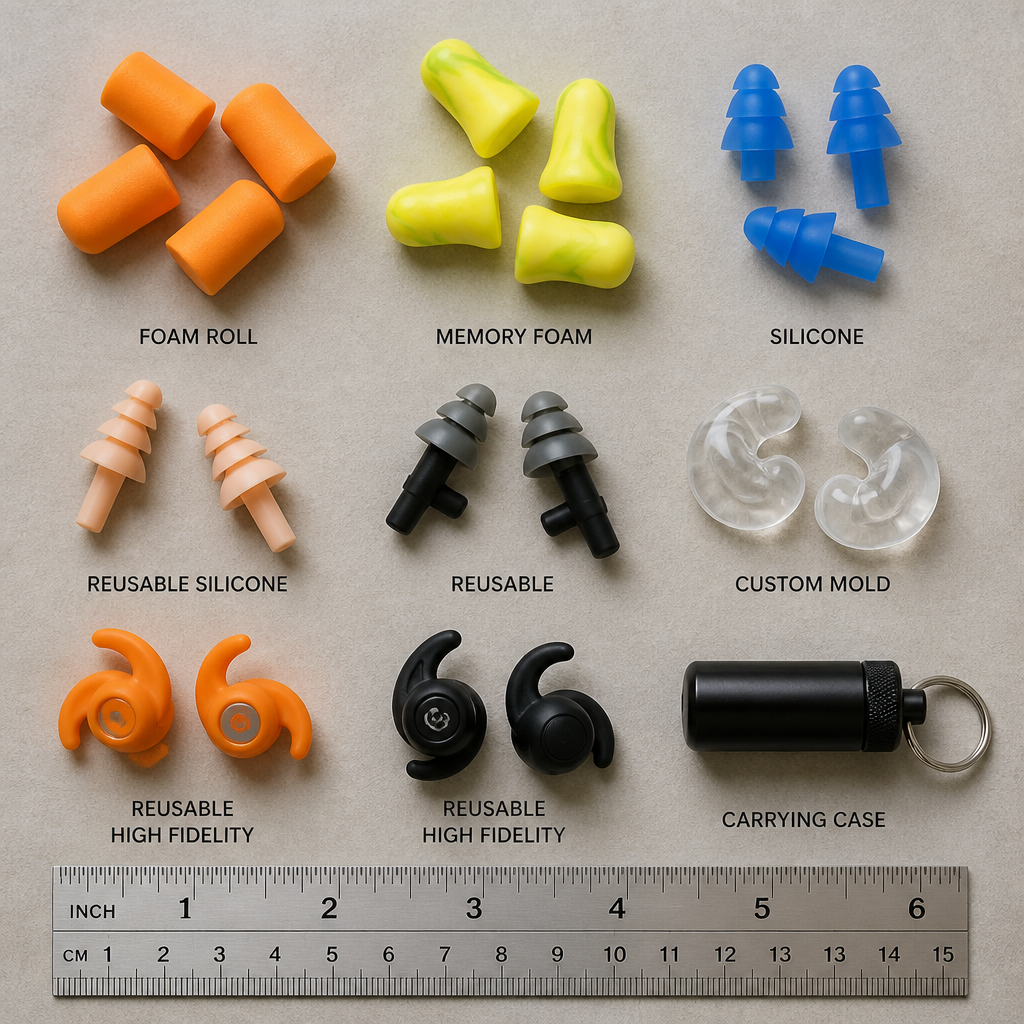
For disposable foam ear plugs and any memory foam tip that needs compression before insertion, the Roll-Pull-Hold method is the correct technique. It is not complicated, but each step has a specific purpose. Skipping any one of the three steps reduces effectiveness significantly.
Using your thumb and forefinger, compress the foam into the thinnest, smoothest cylinder you can manage. Aim for a torpedo shape with no creases or lumps. A creased plug creates channels along its surface that allow sound to bypass the foam entirely. The thinner the compressed cylinder, the deeper it can seat before expanding.
Pro tip: Roll with clean, dry hands. Oils from skin and any moisture change the surface friction of foam and make it harder to compress uniformly. This matters especially for memory foam tips, which are denser than standard disposable foam.
Reach over the top of your head with the opposite hand and grasp the top of your outer ear. Pull it gently upward and slightly backward. You will feel the ear canal open. This straightens the natural curve of the canal and is the step most people skip entirely because it feels unnecessary. It is not optional.
With the canal straightened, slide the compressed plug into the ear canal using a gentle rotating motion and hold it in place with your fingertip. Keep your other hand pulling the ear. Hold for a full 20 to 40 seconds. The foam is expanding against the canal walls during this time. Let go before it finishes expanding and the plug will partially eject itself, sitting too high and breaking the seal.
A properly inserted ear plug should be nearly invisible from the front. If you can see a cylinder of foam protruding from the ear, the plug has not seated correctly and is delivering a fraction of its rated noise reduction.
Reusable plugs like ATTENU8 with a rigid metal body and replaceable memory foam tips use the same fundamental technique, but with a few practical differences. The metal body does not compress, so you are only compressing the foam tip, not the entire plug. This makes the insertion marginally more precise.
Hold the aluminium body between your fingers and compress the memory foam tip with your thumb and forefinger. The tip should reduce to roughly half its resting diameter. Memory foam is denser than disposable foam, so it takes slightly more pressure to compress, but it also holds its shape during compression better, making the torpedo form easier to achieve cleanly.
Rather than pushing straight in, use a slow half-turn rotation as you insert the plug. This distributes the tip evenly against the canal wall and seats it more consistently than a direct push. The rotating motion also helps identify whether you have reached the correct depth, because you will feel the tip engage the canal walls with slight resistance when it is properly positioned.
Pull the ear upward and backward, insert with a gentle rotation, and hold for 20 to 30 seconds. Because the metal body provides a stable handle, you can hold the plug in position without pressing uncomfortably against the canal opening.
Pro tip: Insert your ear plugs while sitting upright, then lie down gently once the foam has expanded. Trying to insert while already lying on your side creates an awkward angle and makes it nearly impossible to pull your ear correctly. Gravity also assists with initial positioning when you are upright.
ATTENU8 ships with XS, S, and M tips for exactly this reason. Start with S and run a seal check. If the cupped-hands test shows leakage, try M. If M creates pressure or discomfort, go back to S or try XS. The goal is the smallest tip size that seals completely without causing pressure. A tip that is too large creates discomfort and can actually compromise the seal by distorting the canal shape. For detailed guidance on selecting the correct size, the ATTENU8 ear plug size guide covers the XS, S, and M fit criteria in detail.
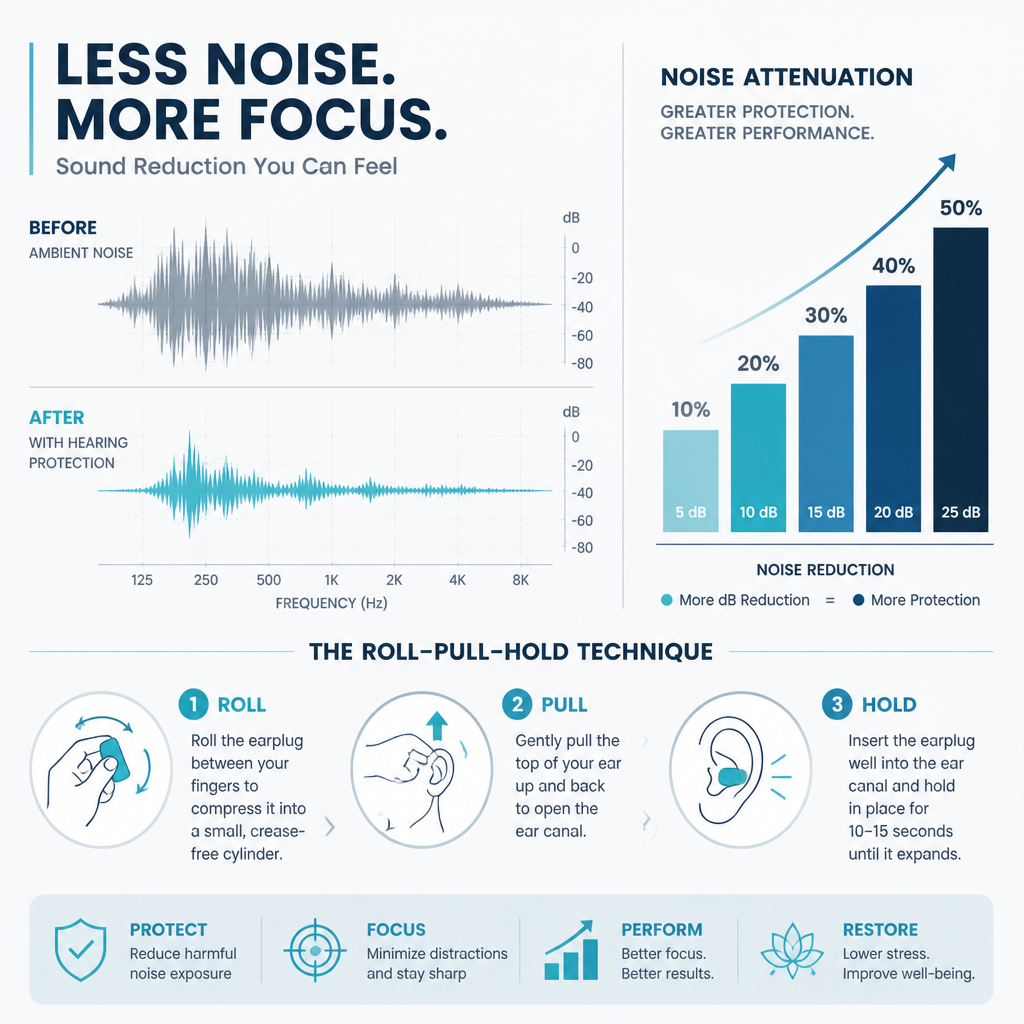
Never assume the seal is correct. Two tests take under 30 seconds combined and will tell you definitively whether the plug is seated. Run them every time until correct insertion becomes automatic. After that, run them whenever you change tip sizes or try a new ear canal position.
With both plugs inserted, cup your palms tightly over your ears and release. If the ambient noise level barely changes when you add your hands, the plugs are sealing effectively. If covering your ears makes the room noticeably quieter, the plugs are not doing their job and need to be reinserted. The logic here is simple: if your hands are doing more work than the plugs, the plugs are not sealing.
Hum quietly or say a word aloud immediately after insertion. With a good seal, your own voice sounds noticeably louder and more resonant inside your head, as if you are speaking into a closed chamber. This is the occlusion effect, and it is a reliable physical confirmation that the seal is intact. If your voice sounds normal or only slightly different, remove and reinsert.
The occlusion effect can feel strange the first few times, especially for new ear plug users. It is not a sign that something is wrong. It is exactly the confirmation you want.
The technique is consistent across use cases, but the context changes some practical details. Sleep, travel, and occupational use each create conditions that affect how you approach insertion.
Sleep is the use case where technique failures hurt the most, because a plug that backs out at 2 AM while you are asleep cannot be reinserted consciously. The priority is achieving a deep, stable seal before you lie down. Insert in a seated position, confirm the seal with both tests, then move carefully to your sleeping position.
For side sleepers specifically, a plug that protrudes will be pushed against the pillow and forced out of position as you move during sleep. Low-profile reusable plugs with a concave aluminium body, like ATTENU8, sit recessed within the ear rather than protruding, which removes the pillow pressure problem entirely. For more on this specific challenge, sleeping on your side with ear plugs covers the design considerations in detail.
Aircraft cabins are noisy, pressurized environments where ear canal pressure changes can affect how a plug seats over time. Insert fresh tips before boarding rather than waiting until the noise becomes annoying, because a rushed insertion in a cramped seat is harder to execute correctly. Confirm your seal while seated at the gate.
Construction, manufacturing, and similar environments require consistent, repeatable insertion technique across an entire shift. Clean hands before insertion matter more in occupational contexts because repeated daily handling increases contamination risk. Workers who replace disposable foam daily are also more likely to have proper expansion capacity than those reusing degraded plugs. Switching to reusable metal-bodied plugs with replaceable tips removes the daily degradation variable entirely, since the tip material stays fresh across multiple uses. The article on loud environments where reusable ear plugs pay off breaks down which occupational settings benefit most.
| Plug Type | Insertion Technique | Common Failure Point |
|---|---|---|
| Disposable foam (e.g. standard single-use plugs) | Roll entire plug into thin cylinder, pull ear up and back, insert two-thirds of the way in, hold 20 to 40 seconds | Not rolling thin enough; releasing too soon before full expansion; reusing a stiff, compressed plug that no longer expands |
| Reusable memory foam tipped (e.g. ATTENU8) | Compress only the foam tip, pull ear up and back, insert with gentle rotation, hold 20 to 30 seconds; confirm seal with cupped-hands and occlusion tests; choose from XS, S, M tip sizes | Skipping tip size selection; pushing in without rotating; not replacing worn tips at the 6 to 8 week mark when foam loses expansion capacity |
| Pre-moulded flanged reusable (e.g. triple-flange silicone) | No rolling required; pull ear up and back, insert with a rocking motion until the outermost flange is flush with the canal entrance | Not pulling the ear during insertion; using the wrong size flange; forcing in too deep and causing pressure pain |
The plug should sit deep enough that it is flush with or just inside the ear canal opening, with little to nothing protruding visibly. If you can see a cylinder of foam sticking out beyond the outer ear, the plug is too shallow and is almost certainly not sealing. Deep insertion is the standard for maximum noise reduction, not shallow or partial insertion.
The most likely causes are not holding the plug long enough during insertion (the foam backs out before fully expanding), using the wrong tip size for your canal, or inserting while already lying down which prevents you from correctly pulling the ear to straighten the canal. Try inserting while sitting, holding for a full 30 seconds, and confirming the seal before lying down. If the problem persists with a particular tip size, try moving up one size.
The occlusion effect is the experience of your own voice sounding louder, more resonant, and slightly bass-heavy when your ear canal is sealed. It happens because bone-conducted sound from your own speech is trapped inside the sealed canal. It is normal, expected, and actually desirable. A sealed ear plug produces a clear occlusion effect. If your voice sounds unchanged after insertion, the plug is not sealing.
Yes. A plug that is inserted without pulling the ear typically sits at an angle against the curved canal wall, creating uneven pressure on one side. This causes the soreness or pressure sensation people often blame on the plug design itself. Correct insertion, with the canal straightened by pulling the ear, allows the foam to expand concentrically against the canal wall with even pressure, which is significantly more comfortable during extended wear.
Every 6 to 8 weeks for regular daily use. Memory foam tips compress and decompress hundreds of times, and the cell structure gradually degrades, reducing the tip’s ability to expand fully against the canal wall. A tip that no longer expands to its original volume cannot form a complete seal, regardless of how well the insertion technique is executed. For ATTENU8 specifically, replacement tips are available in the same XS, S, and M sizes as the original set.
You need to pull your ear for all plug types. The ear canal curves regardless of what type of plug you are inserting. Pre-moulded flanged plugs need the canal straightened so that each flange seats evenly rather than one side pressing against the canal wall at an angle. The pull is a universal step, not specific to foam plugs.
The aluminium body does not compress, so you are compressing only the memory foam tip rather than the whole plug. Memory foam is also denser than standard disposable foam, so it requires slightly more finger pressure to compress, and it expands more slowly and precisely. The advantage is a more consistent, stable seal across repeated insertions. Use the gentle rotating motion during insertion to distribute the tip evenly, and hold for a full 20 to 30 seconds to allow complete expansion.
If you have been wearing ear plugs for years and are now realizing the insertion was never quite right, you are not alone. Share what changed for you after fixing your technique, or ask a question below.
We would love your feedback and any insights you would share with others. What perspective would you add?
Most people wearing ear plugs are getting less than half the rated noise reduction they paid for. The reason is almost never the product. It is insertion technique. Studies from the National Institute for Occupational Safety and Health show that real-world attenuation can fall 5 to 15 dB below the labeled Noise Reduction Rating when users insert ear plugs incorrectly. For a light sleeper trying to block a snoring partner, or a construction worker standing next to a jackhammer, that gap is the difference between protected and exposed. This guide covers exactly how to insert ear plugs correctly, with specific steps for memory foam tips and the metal-bodied design used by ATTENU8.
| Key Insight | Explanation |
|---|---|
| Roll the foam tip tightly before insertion | Compressing the memory foam to a narrow cylinder allows it to fit deep into the ear canal before expanding into a seal. |
| Pull the ear up and back before inserting | Straightening the ear canal by pulling the outer ear upward and backward allows the plug to travel deeper and seal properly. |
| Hold the plug in place for 20 to 30 seconds | Memory foam needs time to expand fully inside the canal. Releasing too early causes the plug to slide out before a seal forms. |
| Tip size matters as much as technique | Using an XS tip in a larger canal, or an M tip in a narrow canal, prevents a proper acoustic seal regardless of how well you insert it. |
| Check the seal by cupping your hands over your ears | If ambient sound drops noticeably when you cup your ears over inserted plugs, the seal is incomplete and needs correction. |
| Dirty or oily ear canals reduce seal quality | Inserting ear plugs into ears coated in skin oils or residue reduces how well memory foam grips the canal wall. |
| Metal-bodied plugs require a different grip technique | With ATTENU8’s aluminium body, you hold the body rather than the foam tip during insertion, keeping the foam clean and uncompromised. |
The Noise Reduction Rating on any ear plug is a laboratory number. It is measured under controlled conditions by trained technicians who know exactly how to insert ear plugs correctly. When you replicate that technique, you get close to that number. When you do not, you get whatever partial attenuation a loosely seated plug can deliver.
The NIOSH research is unambiguous on this point. Their field studies found that workers frequently achieve only 33 to 50 percent of the labeled NRR because of poor fit. A plug rated at 32 dB, like the ATTENU8, can perform closer to 10 to 16 dB when inserted carelessly. That is inadequate for a construction site, and it is inadequate for a bedroom next to a loud street.
The good news is that technique is a learnable skill. Once you understand what a proper seal actually feels like, insertion becomes automatic within a few days of practice.
“The single most correctable factor in hearing protection failure is insertion technique. Product quality matters, but it cannot compensate for a plug that never reached a sealed position.” – National Institute for Occupational Safety and Health (NIOSH), Hearing Loss Prevention guidance
This process applies directly to memory foam tipped ear plugs, including the soft foam tips that come with ATTENU8 in XS, S, and M sizes. The aluminium body does not compress, but the foam tip does, and that foam is what creates the acoustic seal inside your canal.
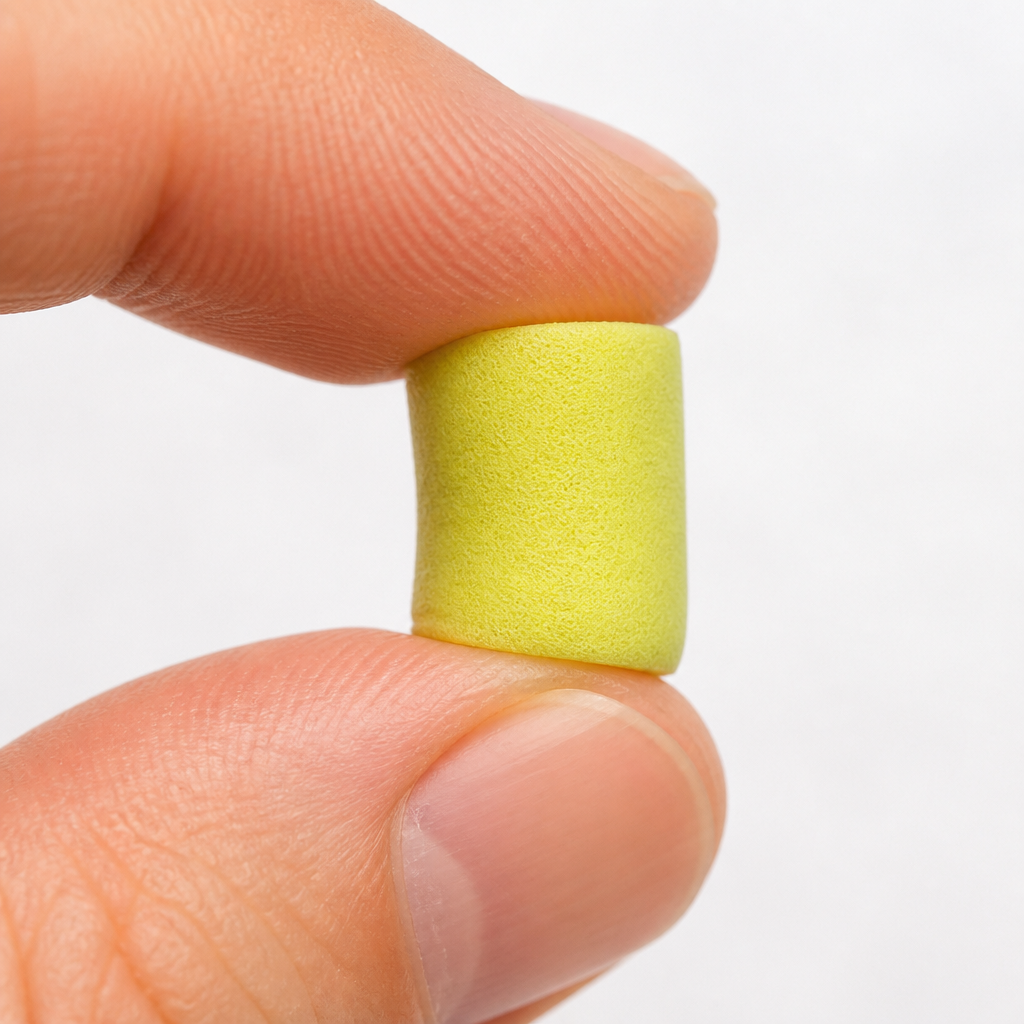
Skin oils transferred to memory foam change its expansion behavior and introduce bacteria into the ear canal. Wash your hands before handling the plugs, especially before touching the foam tips.
Using your thumb and index finger, compress the memory foam tip between your fingertips, rolling it into the narrowest cylinder possible. For ATTENU8, you grip the aluminium body and roll only the foam tip. Do not rush this step. A poorly compressed tip will not travel deep enough to seal.
Reach your opposite hand over your head and gently pull the outer ear upward and backward. This straightens the natural S-curve of the ear canal and gives the compressed plug a clear path to insert deeply. This single step is the most commonly skipped, and skipping it is the most common reason for a poor seal.
While holding the ear canal open, slide the compressed foam tip gently but firmly into the canal. The tip should sit deep enough that the base of the foam is roughly level with the canal opening. With ATTENU8, the aluminium body will sit partially visible at the ear entrance. Do not stop inserting early because of mild resistance.
Memory foam ear plug how to use guides often understate this step. The foam needs dwell time to expand against the canal walls. Keep gentle inward pressure on the plug and hold your jaw still. Speaking or chewing during expansion will distort the seal.
Once the foam has expanded, gently cup both palms over your ears without pressing the plugs. If the ambient sound level changes noticeably when you add your palms, the plug has not achieved a full seal. Remove, re-roll, and repeat.
Pro tip: Insert ear plugs in a quiet room the first few times you learn the technique. Without background noise, you can hear the moment the foam expands and seals, which gives you immediate feedback that you cannot replicate in a loud environment.
Getting the best seal with ear plugs is about more than insertion depth. It is about the relationship between foam density, canal geometry, and dwell time working together. Each element can independently break the seal if ignored.
Cold memory foam expands more slowly than warm foam. If you are inserting ear plugs in a cold room or handling them after they have been stored in a cold bag, warm the foam tips briefly between your palms for 10 to 15 seconds. This restores normal expansion speed and improves the quality of the seal.
The ear canal shifts shape when you open your mouth. Insert ear plugs with your jaw in a relaxed, closed position. If you frequently wear ear plugs while talking or eating, test whether your seal breaks under jaw movement. A slightly deeper insertion usually compensates for canal movement in active use.
ATTENU8 recommends replacing foam tips every 6 to 8 weeks. Tips that have been compressed and expanded hundreds of times lose their resilience and no longer expand fully inside the canal. A worn tip looks intact but delivers significantly less attenuation than a fresh one. This is a concrete advantage of ATTENU8 over fully disposable alternatives: you replace only the foam, not the entire plug, keeping the cost of maintaining proper protection low.
Pro tip: Sniff test your foam tips every two weeks. Memory foam that has absorbed skin oils and moisture develops a noticeable odor before it visibly degrades. That odor is your signal that tip replacement is due, regardless of whether you have reached the 6 to 8 week mark.
In practice, the same mistakes appear repeatedly across both first-time users and people who have worn ear plugs for years. Familiarity breeds complacency, and complacent insertion is the enemy of consistent attenuation.
Pushing an uncompressed foam tip into the ear canal does not work. The tip will sit at the canal entrance without penetrating deeply, and you will get maybe 8 to 12 dB of reduction from the mass of the foam alone. This feels like it is working because there is some noise reduction, but it is nowhere near the 32 dB available from a properly seated plug.
The adult ear canal curves. An unstraightened canal is like trying to post a letter through a bent tube. The plug meets resistance before it reaches the correct depth and then expands in a position where the canal curves away from it. The result is a partial seal that fails completely during any jaw movement.
This is the most common mistake among users who think they are inserting correctly. They roll, insert, and release within 5 seconds. The foam then pops partially out as it expands, settling at the canal entrance rather than the canal interior. Hold for a full 20 to 30 seconds without exception.
A common mistake is assuming the medium tip is correct without testing smaller or larger options. ATTENU8 ships with XS, S, and M foam tips specifically because ear canal diameter varies significantly between individuals. If you consistently find that your plugs work loose during sleep or produce inconsistent results, try one size smaller. Smaller tips seat deeper and often seal better than tips that are technically the right length but too wide for your canal to close around fully.
Tip size selection is the most overlooked variable in ear plug performance. The right size creates a seal with minimal insertion force and holds without discomfort during extended wear. The wrong size either fails to seal or causes pressure that makes long-term wearing unbearable.
The data consistently shows that most adults default to medium tips without testing alternatives. In audiological fitting studies, a substantial proportion of users achieve better attenuation with small tips because smaller foam compresses more completely and then expands to fill the canal snugly rather than stretching it.
For ATTENU8 users, the practical test is straightforward. Insert each size using the correct technique, hold for 30 seconds, then apply the palm cup test described earlier. The size that produces the greatest sound reduction when you remove your palms is your correct size. Run this test in a consistently noisy environment, like a running kitchen tap or a fan, so you have a reference sound level to judge against.
If you sit between sizes and find that the smaller size seals but feels like it might come loose, and the larger size seals but creates pressure, try the smaller size with slightly deeper insertion. Depth compensates for a diameter that is marginally small.
Not all ear plug insertion approaches are equal. Below is a direct comparison of three methods that users commonly attempt, including the correct technique versus two common shortcuts.
| Insertion Method | Technique Description | Typical Noise Reduction Achieved |
|---|---|---|
| Full Roll-and-Hold (Correct Method) | Foam rolled tightly, ear canal straightened by pulling ear up and back, plug inserted deeply, held 20 to 30 seconds until foam expands fully. | Close to rated NRR, up to 32 dB with ATTENU8 |
| Quick Push (Common Shortcut) | Foam lightly compressed, inserted without canal straightening, released immediately after placement. | Estimated 10 to 16 dB, 50 to 60 percent below rated NRR |
| No Compression (Incorrect) | Unrolled foam tip pushed against canal entrance without deep insertion or canal straightening. | Estimated 5 to 10 dB, primarily from foam mass rather than acoustic seal |
The difference between the correct method and no compression is not marginal. It is the equivalent of comparing a closed door to an open window when trying to block street noise. The correct ear plug insertion technique is the single highest-return change any ear plug user can make, at zero additional cost.
The foam tip should sit deep enough in the ear canal that the base of the foam is roughly flush with or just inside the canal opening. For ATTENU8, the aluminium body will remain visible and accessible outside the ear. If you can see a significant portion of the foam tip, the plug is not inserted deeply enough to achieve a full acoustic seal. Deeper is almost always better, provided there is no pain or sharp pressure sensation.
Most people have slightly asymmetrical ear canals. The ear that seals better is likely the one where your canal geometry more closely matches the tip size you are using. Try a different tip size in the ear that seals poorly. It is also common for one ear canal to curve more sharply, so extra attention to pulling that ear fully backward and upward during insertion will help considerably.
Use the palm cup test. After inserting both plugs and waiting 30 seconds for full foam expansion, cup your palms firmly over both ears without pressing on the plugs themselves. If the ambient room sound drops meaningfully when your palms are on, the seal is incomplete. If sound level stays roughly the same with or without your palms, the plugs have already achieved close to maximum attenuation and the seal is good.
Yes, ATTENU8 foam tips are designed to be reused. The aluminium body is reused indefinitely and only the foam tips require periodic replacement every 6 to 8 weeks. Reuse does affect insertion quality over time. As foam accumulates skin oils and undergoes repeated compression cycles, its expansion speed slows and its maximum expanded diameter decreases. A tip approaching end of life will feel easier to insert but will deliver noticeably worse attenuation because it no longer expands enough to contact the full canal wall.
The fundamental technique is identical. The difference is in how you manage comfort during extended wear. For sleeping, slightly shallower insertion that still seals can reduce pressure discomfort on the side of your head against a pillow. For high-noise workplaces like construction or manufacturing, maximum depth insertion is non-negotiable because the acoustic consequences of a partial seal are potentially permanent hearing damage. When in doubt in a loud environment, always prioritize depth and seal quality over comfort.
Ear plugs that fall out during sleep were either not inserted deeply enough, not held long enough during foam expansion, or are the wrong tip size. If the foam expands while still at the canal entrance rather than inside the canal, normal pillow movement or jaw shifting during sleep creates enough force to dislodge the plug. Re-roll more tightly, insert more deeply, and hold for the full 30 seconds. If the problem persists, try one tip size smaller, which tends to stay seated more securely because the canal walls grip it more firmly.
Have you tried the roll-and-hold technique described here? Share what worked for you, or tell us which step made the biggest difference in your seal quality.

